
Since putting The Way of St Francis guidebook together and publicizing that free GPX tracks are available for use by pilgrims, I’ve had many requests about how to set up GPS devices and smartphone apps with the GPX tracks. Rather than answer each one individually, I’ve decided to put together this blog post that will hopefully answer most people’s questions.
I should say first, though, that the whole purpose of my guidebook is to ensure you can walk the Via di Francesco without need of either a guide or a GPS unit. I worked hard to make very specific route descriptions, and I’ve double-checked the descriptions to make sure they’re clear and correct. However, you may want the added security of a GPS and I get that. So here’s how to get going.
A hiking GPS is not like the GPS in your car
Maybe most people already know this, but just in case you don’t, having a GPS unit for hiking is a lot different than having one in your car. In the car, once you’ve set your destination a nice voice guides your every turn until you arrive. Not so with a hiking GPS! In the GPS world that function is called “routing” and it’s a feature that doesn’t yet exist yet on the standard hikers’ GPS. Instead, a hiking GPS will simply have a map and a cursor that shows you where you’re at on the map according to GPS satellite coordinates. That’s not particularly useful, because you still don’t know how to get from Point A to Point B.
That’s where tracks come in. A “GPX Track” is A recording (or computerized plotting) of a specific route. While I was walking the Via di Francesco in summer of 2014 I recorded my track, which means that every several meters the GPS unit would automatically plot the latitude and longitude of my location. Then it strings the recorded locations together into a “track.” At the end of the day I would carefully preserve my daily tracks for later use in the putting the book’s maps together and to be able to share with other pilgrims. The tracks are very useful because they allow a walker to see precisely where I walked and follow that on the screen of their GPS or smartphone so they don’t get lost.
Hurray! So, all that’s needed is a GPS or smartphone and the GPX tracks, right?
Not so fast. Your GPS needs a good map to tell you where you are
If you buy an American-made GPS, you should know that it probably has great maps of the United States. Perhaps Canada, too. But if you’re walking the Via di Francesco, you’ll want to have a good map of Central Italy that includes roads, towns, topography and, importantly, hiking trails. That means finding a good hiking map that will work with your Garmin and then downloading onto the unit.
I’ve found that the best GPS hiking maps in Italy are all based on the Open Cycle Map source. When I walked in 2014 I downloaded that onto my GPS and it worked great.
Here’s where smartphone hiking apps have an advantage. Since their purpose is hiking, they often come with preloaded Open Cycle Maps! That’s a big plus, since it saves you the step of downloading the map.
So now you see the basic three steps:
- Make sure your unit either has a good hiking map already or download a good map for it.
- Download the GPX tracks (here are instructions)
- Learn how to use them
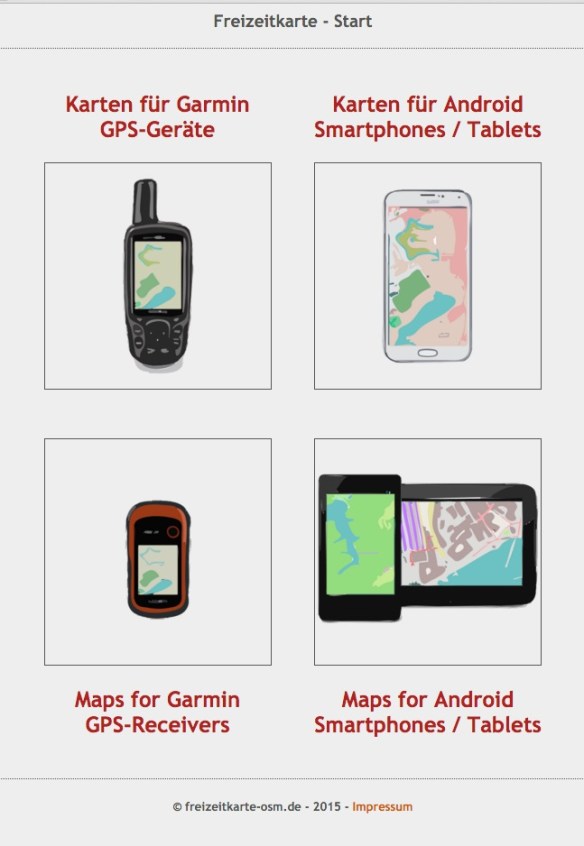
Option 1: Garmin GPS: Downloading the map and GPX tracks
Right now, a German website is the best place to find our Open Street Map.
- Go to the website: http://freizeitkarte-osm.de
- Click on the the option “Maps for Garmin GPS-Receivers”:
- That will give you an overview page that looks like this.

- Now click on the “Maps” tab and go down to “Other Maps.” Click on Italy. Going down the list, you’ll find Italy just after Finland right here:
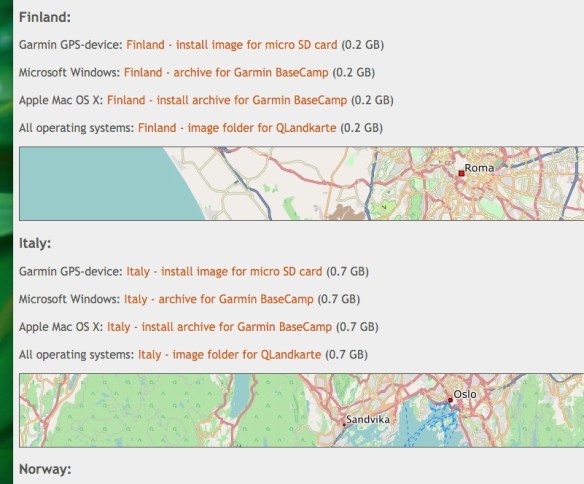
- Click on “Garmin GPS-device: Italy-install image for micro SD card (0.7GB). A download to your computer now begins. The result is a file ITA_en_gmappsupp.img.zip. This is an archived file of the map image of all Italy. Once it’s downloaded, click on the file to un-archive it. You end up with a file folder marked “OFM(EU2016_SE_GPS” or similar. Open that file and look for the large file labeled “gmapsupp.img.” That’s our map!
- Now, plug your Garmin into your computer using the USB cable. Choose the option “Mass Storage” on the Garmin device. The Garmin is now like a flash drive — it shows up among devices in your file directory and is aptly labeled “Garmin.”
- Click on the device. You’ll now see a folder that looks something like this:

- Bravo. Now, look for that “gmap.supp.img” file you’ve downloaded onto your computer. Click and drag it into your Garmin. You can see where mine is, and it seems to work just fine there. The Garmin now loads the map into its flash drive.
- Once the download is complete. Eject the Garmin from your computer and unplug it. Turn on the unit. Go to “Settings” then “Maps” and look for the Freizeitcarta map. You should see it in the map list. Click there and you’ve got your map!
Great job. All that’s left is to load the GPX tracks. Since you’ve done the map already, the GPX tracks are easy. Just download them onto your computer, plug your Garmin into your computer again, and click and drag them to the file marked GPX in your Garmin. You can access these tracks once they’re downloaded and you’ve ejected and turned on your Garmin by going to “Existing Tracks” in the main desktop.
Option 2: Smartphone App: Using MotionX GPS and downloading the GPX tracks to your iPhone
There are literally dozens of smartphone hiking apps — too many to review — but I’ve focused on MotionX GPS because of its strong user ratings and because it already has the Open Cycle Map as part of its MotionX Terrain setting. MotionX GPS is an iPhone app, so if you’re on the Android platform you should look at something like Gaia or the dozens of other apps out there.
The process of loading GPX tracks on MotionX GPS is also quite simple. Here’s how it works:
- Download the GPX tracks you want to use onto your computer.
- Attach a GPX track to an email and send it to the email account that is on your iPhone. You should plan to use either the Apple email app or the Gmail email app. This won’t work if you just access your email through Safari on the iPhone.
- Open the email app on your iPhone

- Press and hold on the attachment.
- Click “Open”

- You’ll see a screen of gibberish appear — that’s what the GPX file looks like in text format.

- Press and hold on the screen until you see the up arrow button. Click on that
- Choose “open in MotionX GPS” and the program will tell you it’s ready to import the GPX track onto your phone.

- Click on the word “Import” in green letters.

- When it’s done, click “Menu” and then “All Tracks.” Identify the track and click on it and you’ll see a map of the track. Here’s the track from Florence to Pontassieve (Stage 1). Voila!

- If you’re a neatnik like me and want to keep your tracks organized, click on “View Details” and then type in the name of the track.

It’s also possible to send multiple GPX tracks at the same time, but the process is basically the same.
12. There’s still one more step. Unless you have a great international data plan, you’ll want to download the maps for the stages you plan to walk. Just follow the directions on the phone and do it with a good WiFi connection to save data.
You’re ready to go!
So, that’s the process. What you have now is a screen on your device that shows your actual position on a map. As you walk you can refer to it as needed so you don’t get lost. One word of caution: these units can drain a lot of battery life. Bring along a power supply of some kind — an external battery, for instance — that you can plug in and juice up your battery when needed. In the case of the smartphone, turn off all unnecessary programs and processes, like WiFi and your cell signal (by putting it in Airplane Mode) and that saves your battery life.
Questions? Most of this is elementary computer management, so please don’t contact me for computer questions. Find your local computer geek who can walk you through all this using the above directions. Most of all — enjoy!
